Angular 2 is not here. It will take a pretty long time until we can start using it. But, as you've probably heard, the changes will be HUGE.
This is a good enough reason to start preparing for Angular 2 today (otherwise the migration path will be painful).
Another important point: a lot of new projects do not use Angular because of the fear of the new Angular 2 (as in, "why should I start a new project using Angular 1.x if soon after I will have to go through a painful migration path?")
So, what do we need to do today in order to make the migration to Angular 2 easier? I will sum it up in three steps, from the most important and complicated to the easiest:
- Use Component Based Architecture
- Write Angular 1.x using ES6/Typescript
- Use the "New Router"
In this post (part 1), I will be focusing on the first step, "Use Component Based Architecture".
Using Component based Architecture
This is the most important part, and the hardest one. Angular 2.x, similar to React, is based on components. It uses component structure hierarchy. Angular 1.x does not work that way. The easiest way to understand this is through an example. I will use the phonecat demo as an example. Take a look at this code:
<div class="container-fluid">
  <div class="row">
    <div class="col-md-2">
      <!--Sidebar content-->
      Search: <input ng-model="query">
      Sort by:
      <select ng-model="orderProp">
        <option value="name">Alphabetical</option>
        <option value="age">Newest</option>
      </select>
    </div>
    <div class="col-md-10">
      <!--Body content-->
      <ul class="phones">
        <li ng-repeat="phone in phones | filter:query | orderBy:orderProp"
            class="thumbnail phone-listing">
          <a href="#/phones/" class="thumb"><img ng-src=""></a>
          <a href="#/phones/"></a>
          <p></p>
        </li>
      </ul>
    </div>
  </div>
</div>
In order to make this code Angular 2.x ready (and more reusable), we will have to:
- Break the html into components.
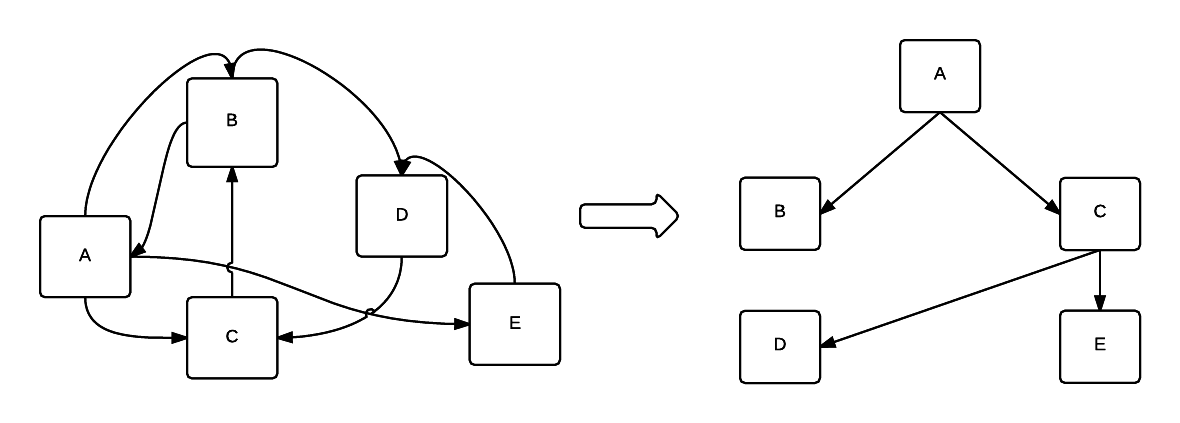
- Build the components as a hierarchy tree. Something like this:
Step 1 - Break the Code into Components
We will want to build several components:
- Application main component (this will be used for the parent component in the hierarchy)
- Search component
- List component
- List item component
- Catalog details component
I will omit the last two components from my example, just in order to keep things simple.
Step 2 - Creating a Hierarchy Tree
Angular 2.0 uses an approach similar to Facebook React's approach, and this is the tricky part. The main issue here is to correctly pass data/state between components, with minimum usage of scope or controllers (as you probably heard, Angular 2.x does not have scope or controllers...).
Let's call it 'The React way'...
The 'React way'
React.js uses state and props to manage its data. Props are immutable and are passed from parent to child. They are owned by the parent and they cannot be changed by the component. State, on the other hand, is private and mutable (it can be changed by the component). For child-parent communication it uses simple events, in order to invoke methods on the parent.
For more reference see those two awesome tutorials: Thinking in React and React's Official Tuturial
We will now have a main phonecat-component which will hold a phonecat-search and a phonecat-list child components. Those two child components will get all the data they need from their parent, via attributes.
It should look somehting like this (The complete example can be found in the following plunker):
<!-- body -->
<body ng-controller="PhoneListCtrl as phoneCtrl">
  <phonecat-component phones=phoneCtrl.phones></phonecat-component>
</body>
<!--phonecat-component template-->
<div class="container-fluid">
  <div class="row">
    <div class="col-md-2">
      <phonecat-search search="vm.search(searchData)"></phonecat-search>
    </div>
    <div class="col-md-10">
      <phonecat-list phones="vm.phones" filter-data="vm.filterData"></phonecat-list>
    </div>
  </div>
</div>
As you can see, our body contains only one main component phonecat-component. Its directive is:
'use strict';

angular.module('phonecatApp')
  .directive('phonecatComponent', phonecatComponent);

function phonecatComponent() {
  return {
    scope: {},
    bindToController: {
      phones: "="
    },
    link: function(scope, elm, attrs, ctrl) {
      ctrl.filterData = {
        text: '',
        orderBy: 'name'
      }; //default search filter
      ctrl.search = function(searchData) {
        ctrl.filterData = searchData;
        scope.$apply();
      }
    },
    controller: function() {},
    controllerAs: 'vm',
    templateUrl: 'partials/phonecatComponent.tpl.html'
  };
}
There are several points to stop and discuss here:
phonecat-listchild componenet receives its data using 'phones' and 'filter-data' attributes.- 'Search' method is used to receive events from child 'phonecat-search' component.
- We use 'bindToController' to pass 'phones', via attribute, to the
phonecat-component. This feature was introduced in Angular 1.4, but no worry, you can acheive the same results with older Angular versions as well (see snippet below for more details). I will use this technique with other components, as well.
For more information about
bindToControlleryou can read this great post. TL;DR: you can replace this with regular isolated scope, if you want to use older Angular versions.
Now, let's take a look at phonecat-search component's directive:
'use strict';

angular.module('phonecatApp')
  .directive('phonecatSearch', phonecatSearch);

function phonecatSearch() {
  return {
    scope: {},
    bindToController: {
      search: "&"
    },
    controller: function() {},
    controllerAs: 'vm',
    link: function(scope, elm, attrs, ctrl) {
      var inputText = elm.find('input')[0];
      var selectedFilter = elm.find('select')[0];

      elm.bind('keyup change', function() {
        var searchData = {
          text: inputText.value,
          orderBy: selectedFilter[selectedFilter.selectedIndex].value
        };
        ctrl.search({
          searchData: searchData
        });
      });
    },
    templateUrl: 'partials/phonecatSearch.tpl.html'
  };
}
The interesting point here is that instead of using ng-model, I am using a search method (with search: "&"), in order to communicate search events to the parent component.
And for phonecat-list component's directive:
'use strict';

angular.module('phonecatApp')
  .directive('phonecatList', phonecatList);

function phonecatList() {
  return {
    scope: {},
    bindToController: {
      phones: "=",
      filterData: "="
    },
    controller: function() {},
    controllerAs: 'vm',
    templateUrl: 'partials/phonecatList.tpl.html'
  };
}
As you can see, same pattern applies here: data passed to child component using attributes, phones and filterData.
To sum it up - we are now much closer to Angular 2's component structure, as seen here. You can see the whole thing in action in this plunker.
Stay tuned to the other two parts:
- Write Angular 1.x in ES6/Typescript
- Use the "new router"